
Vuokatti Shirt Free Pattern
Немедленно
Информация о наличии на складе
Описание товара
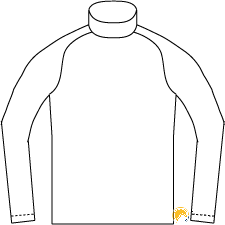
The Vuokatti Pullover is a basic pattern useful for all your layer 1 and layer 2 shirt needs. The raglan sleeve gives a sleek but functional look, and many combinations of collars can give variation. The pattern can also be used to make short sleeved T-shirts.
| Shelby Kaava Shirt Sizing | ||||||
|---|---|---|---|---|---|---|
| Men (C) | 40-42 | 44-46 | 48-50 | 52-54 | 56 | |
| Women (C) | 36-38 | 40-42 | 44-46 | 48 | 50 | |
| XS | S | M | L | XL | ||
| Waist | 67 | 75 | 83 | 91 | 99 | |
| Chest | 84 | 92 | 100 | 108 | 116 | |
| Arm Length | 58 | 60 | 62 | 64 | 66 | |
| Materials needed (140 cm wide) | ||||||
| Fabric | 1,3 m | 1,4 m | 1,4 m | 1,5 m | 1,5 m | |
| Zipper (Optional) | 30 cm | |||||
| Stretch binding (Optional) | 1,5 m | |||||
Material
Any light to medium weight fabric with 50% stretch.
Sizing
When using material with less stretch one size larger is recommended. If a material has more stretch then choose one size smaller.
Options
There are two options in the pattern. Option 1: A zipper can be inserted in the front of the pullover. Option 2: A stretch binding can be used for finishing the hems.
Remember
No seam or hem allowances in the pattern! If sewing using a flat-stitch technique seam allowances are not needed. If using the stretch binding then hem allowances are also not needed. Otherwise if making a normal seam add a 5 mm seam allowance and 2 cm hem allowance when cutting.
- Download the PDF pattern and print it. Below you will find PDFs for A4, A3, Letter and Tabloid paper sizes. Do not apply any scaling. The pattern consists of pages that need to be overlapped and taped together. The alignment marks form boxes with an X in the middle. Download Pattern through the links at the end of page.
-
Cutting
Cut the pieces, paying attention to the stretch marks and to add the seam and hem allowances if needed. Be sure to cut pieces A and B on the fold. -
Attach the sleeve
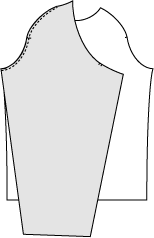 Sew the curved edge of the sleeve together with front piece A, matching the single notch together. Repeat for the other sleeve.
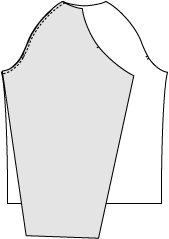 Now sew back piece B to each side of the sleeve, matching the double notch.
-
Side seams
Sew the side seams all the way from the bottom hem to the sleeve cuff.
-
Zipper option: To be added...
Update on 3rd of Jan 2018: Penny from specialtyoutdoors.com helpfully gave us a permission to link to her guide on how to insert a zipper to a shirt like Vuokatti:
http://specialtyoutdoors.com/make-a-bike-jersey/
Scroll past the jersey assembly instructions and there's a fully illustrated step by step set of instructions.
-
Collar
 The collar is first made into a tube. Sew the short ends of the collar together. Fold it in half and baste or serge along the unfinished edge (this makes it easier to sew it to the shirt). Now pin the collar in place to the shirt. Place the collar seam in the middle of the back piece. The collar is smaller than the hole, you will need to "pin by quarters". Start with the back, then pin in the front, then between those. This fits the collar evenly into the hole. Now sew the collar in place while stretching.
-
Hems
Turn the bottom hem over 2 cm and top-stitch from the outside. Use a long stitch or a stretch stitch to prevent the seam from breaking. Repeat this for each sleeve cuff. Alternatively a stretch binding can be applied to the bottom hem and sleeve cuffs. See our guide on using stretch binding.
Possible modifications:
-
Full zipper:
Simply by not cutting piece A on the fold, it is easy to add a full length zipper. -
Short collar:
You can also make a short collar, like typically found on a T-shirt. The collar piece should be 4 cm tall, and about 5-8 cm shorter than that in the pattern. This might need some experimentation to get the right effect.

Приложения
| 301_raglan_pattern_A3.pdf |
| 301_raglan_pattern_A4.pdf |
| 301_raglan_pattern_tabloid.pdf |
| 301_raglan_pattern_letter.pdf |
КомментарииДобавить комментарий